Posable Mandrake Tutorial
FTC Disclosure: Please note that some of the links in this post are affiliate or referral links (full disclosure here), and if you make a purchase or sign up for a service within a certain timeframe after clicking on one of those links, I may earn a small commission paid by the retailer at no extra cost to you. I wouldn't recommend anything that I don’t or wouldn't use myself. Thank you for your support!
Today’s tutorial is a very special one! It is the first of my sponsored tutorial posts (hopefully the first of many), where anyone who donates over a certain amount can sponsor a post, either to be linked back to them, or anonymously if they would simply like me to come up with a simple tutorial to post on the site. If this sounds interesting to you, I go into a little more detail on the home page.
Sponsored By Mayapple Magazine
Today’s needle felting tutorial is brought to you by Mayapple Magazine, a brand new American-based, JP-style manga magazine featuring the work of indie manga creators that is launching its first digital issues literally right now! If you love manga, or if you don’t know if you do but are really curious what it’s all about, definitely go check it out!!! This tutorial is also featured in the September issue on Mayapple’s site.
Why make a mandrake, and specifically an American mandrake at that? Because that’s one of the multitude of common names available for the Podophyllum peltatum, a native understory plant that is commonly found growing in woodlands across the North American continent. It seemed only fitting to create a mascot to go with the new mag (click here to read about why they picked the name).
A Little Background on Mayapples…
The plant and its roots are not quite reminiscent of the mandrakes of folklore, which is a completely different species, typically Mandragora (the Mediterranean mandrakes) or Bryonia alba (the English mandrake). In fact, it’s not so much its appearance, as its medicinal properties, that likely gave it its name. The American mandrake, like the ones in Europe, is a purgative (for those who don’t know, it’s another word for laxative - people were getting constipated long before we had pharmacies). It is still used to this day for medicinal purposes, though as a treatment for something completely different.
Still, I wanted to make a mandrake that more closely resembled the American mandrake root, but had the same feel of the deadly screaming plants across the pond - so I needed a visual. The best I could find was on this site, using the photos of the Sinopodophyllum hexandrum. Although I have an entire field of Podophyllum peltatum growing in my wooded plot (as in the photo below), I did not want to dig them up for a photo op, as they are a vital part of the ecosystem (also, just the idea of digging up a plant for no reason feels wrong).
Side note: the giant leaf placed on the third eye of my Green Man is from one of the mayapples in my yard, in the exact shape and size. I used it as a template, which you can watch in the 3rd video of the series of me making that piece start to finish. If you have never seen these in person, that would give you an idea of the scale of these beautiful plants, and how they truly look like a world of tiny umbrellas. I wouldn’t be surprised if it inspired this part (1 minute 40 seconds in with the baby umbrellas) from one of my favorite children’s shows, Sarah & Duck.
Field of Podophyllum peltatum growing in my woodland yard.
The thing that stood out most to me were the long, spindly roots of this rhizome. This isn’t quite like the fat, chunky mandrakes in the old pictures or from a certain popular book/movie series. I started out with a sketch.

The dirt around the edges of the joints in the rhizome in the original photo was reminiscent of “clothing” - I thought it would give them a bit of character!
Now that I have an idea of what I’m making, let’s do the thing!
Making the American Mandrake
First you’re going to need a few basic supplies. If this is your first time needle felting, I highly recommend you go check out my beginner tutorial on needle felting. This may be a bit of a challenge for a first time project, so definitely try a few others just to get the hang of working with wool, and then come back to take a stab at it.
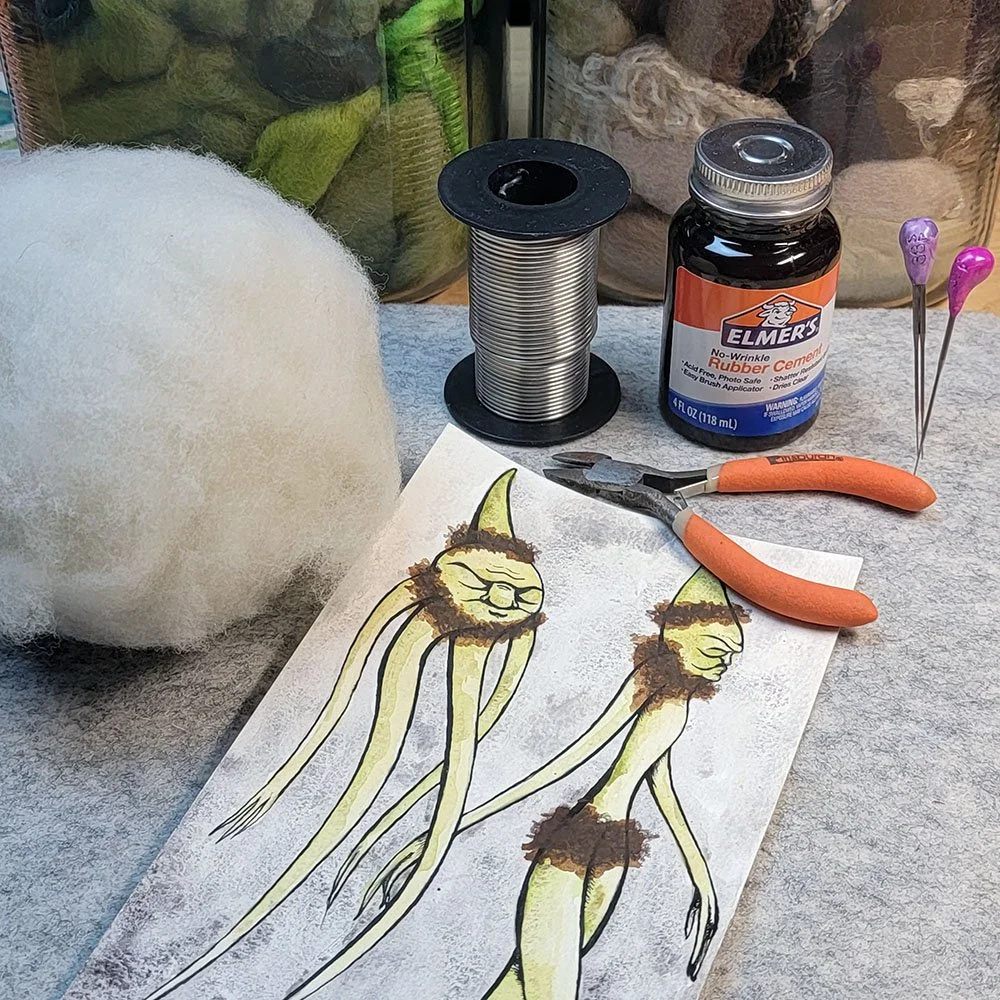
Supplies you will need:
- Wool (core, batting in greens/tans/browns). If you don't know what those terms mean, click here for the glossary. If you are looking for shops where to purchase supplies in your country, check out my ultimate felting supplies shop list here. I also like to collect yarns and other textural bits, which is how I made the "skirt" and "crown" - so keep that in mind when procuring supplies.
- Felting needles (I used a combination of 38 gauge and 40 gauge spiral felting needles. Use whatever works best for you.) - If you need a guide to felting needles, click here.
- Armature wire (I used Jack Richeson 1/16 inch aluminum armature wire - I have the 50 ft roll (pictured), but you can get it in a smaller quantity here.)
- Wire cutters (any wire cutters will do, do not use scissors unless you want to risk dulling or damaging them) - if you need to order a pair, these are good.
- Rubber cement - what I use to make the armature wire sticky to grab the wool as I wrap it. Unless you use rubber cement frequently, I personally recommend getting a pack of the little jars (this is one of those staples I always have on hand somewhere). No matter how well you close the bottle, it starts to dry out every single time you open the jar to use it. This way, you're less likely to end up with a glob of rubber halfway through the jar. Here are links for a two pack or six pack of the 4oz jars.
- Beeswax (not pictured) - I'll share links when I explain what to do with it later in the post. Not necessary to complete the project, just a nice finishing touch.
- A felting base - most people use foam. I like using this wool ironing mat, because I like the low profile and don't stab deeply into it. For me it's all the protection I need for my needles and worksurface, and provides a place for me to work. If you're a beginner, I recommend choosing something a bit thicker (there are thicker wool mats available, beginners would want the softer one). If you want to see what else can be used as a felting base, click here.
- Personal opinion: the best starter kit for tools on Amazon (sans wool, wire or rubber cement) is this one, hands down. The wool I used for the colors in this project came from Living Felt. I have my own core, but they also sell that if you don't have any. I used MC-1 felting batts for the colors - specifically shire and I believe driftwood. If you are already shopping on Living Felt, and you don't have any yarn to make the skirt and crown, I would also recommend grabbing a small amount of sari silk waste from their shop. My personal choices would be olive, mushroom and cocoa. You can use wool from your own supply or any other source. I do suggest making sure that whatever you use are batts and not roving for this project.
The Armature
You’ll want to cut two lengths of wire to start, one that’s just over double the length of about how big you want your mandrake to be (though it will end up being a bit longer due to what you add to the top), and one that’s slightly shorter than that, folded into a skinny U-shape, as shown below. For the head, you can wrap the longer piece around something like a glue-stick and twist it (try to twist both arms evenly so they twist around each other, as opposed to one wire wrapping around the other, but if you can’t get it perfect, it’s okay).

To attach the arms (the U-shape piece) to the body, we are going to get the U, have it behind the body with the arms facing up, and have the arms go in from the top through the circle hole. The two photos below should help you visualize this.


Once you pull it all the way through, you’ll bend the arms down so they go down to the sides where they belong. Meanwhile, cut two pieces of armature wire that are about equal, and slightly shorter than the arm length (I’d say about 3/4 of the length here). This will be used to make the fingers, and you can always cut them down shorter if you’d like to.

To attach the hand/finger pieces, criss-cross a piece with the arm, like an X, and twist together so they wrap around each other (not one around the other). After several twists, take the cut end sticking up, and wrap around so it’s facing down with the other “fingers.” Do this on both arms.


For the next part, I thought I had taken a photo, but apparently I had not; at least it is simple enough to explain. You will want to take the bottle of rubber cement and coat your armature (you can just do sections at a time that you plan to work on) with a thin layer of cement. Give it a few minutes to dry. Once the solvent evaporates, it will leave a rubbery coating on the wire. This isn’t permanent like plasti-dip (you could technically rub it off of the wire if you wanted to); however, you just need the wire to be tacky enough to hold onto the wool as you wrap it around. I find that it just makes it easier to handle the wrapping process. Start in the middle of the finger or limb, wrap down towards the tip and then back up. Tip: it’s helpful if you remember the direction you wrap each time, and keep it consistent so you can go back and tighten what you’ve wrapped if you need to without untwisting it.

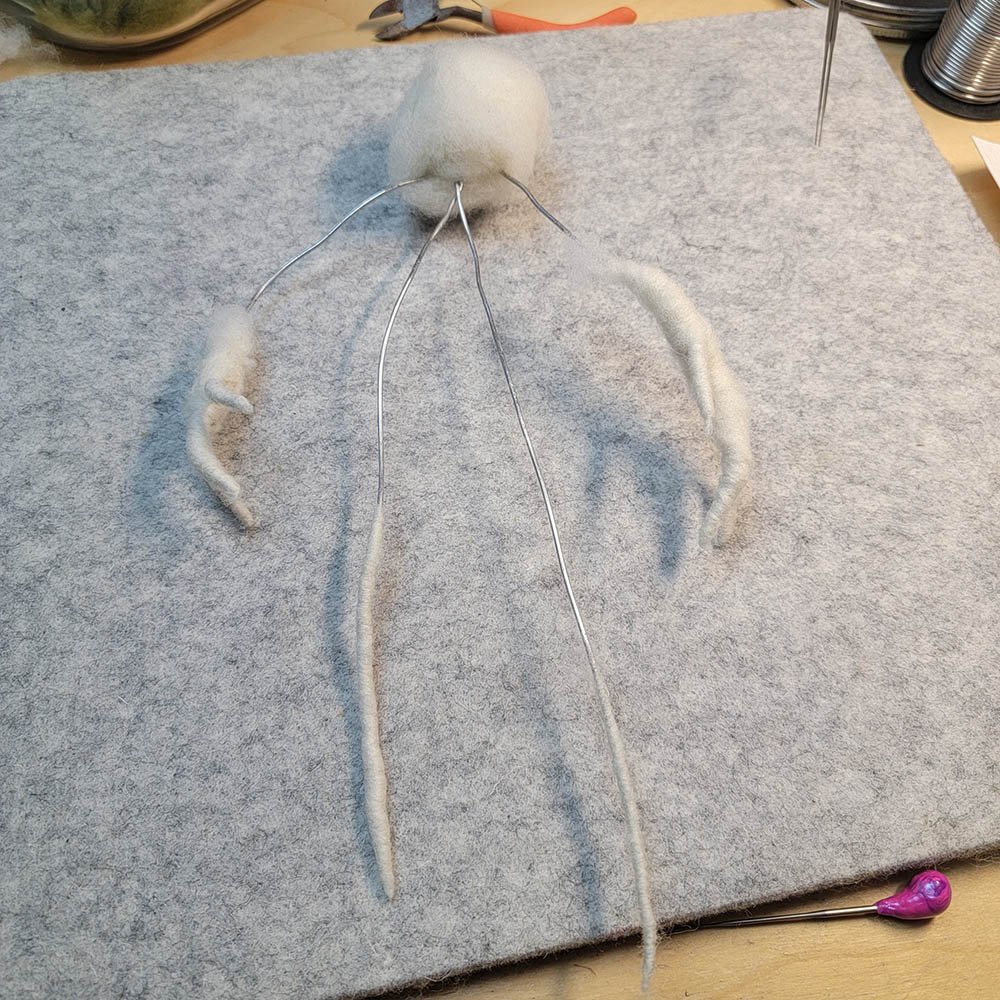
Adding the wool
This part is fairly easy. All we do is carefully wrap thin strips of wool around the armature as tightly as possible. The only part that doesn’t get wrapped is the head. I do the fingers first, and then go up higher and wrap around the hands.

With the legs, I start about an inch from the end, then wrap down towards the end and keep wrapping back up the leg. Each layer I add overlaps the previous a bit, so that it will taper a little going up. That being said, these can be “thick-and-thin.” They are roots, and therefore they do not follow conventional rules of human proportions. You can have a goofy hand. You can have an arm that’s a little thick, then thin, then thick again. Roots aren’t always a uniform shape and thickness, and mythological creatures pretending to plant roots definitely do not follow any rules. For the head, you’ll take a ball of wool, stuff it in the ring. Afterwards, take some more wool and start wrapping it around the head. We’ll worry about that bit later.
If things aren’t “sticking,” especially in spots where the wool starts getting thicker, you can use your needle to start stabbing it down, very carefully. Don’t forget that there is a wire inside. To needle this, you want to go at it pretty much at an angle (watch your fingers), or off the edge of the wire, and go slowly.
Side note: I would highly recommend grabbing a tin of Handy Bandies, and keeping them in your felting stash. I am absolutely obsessed with Welly bandages, and have the Handi Bandies in the veggie style. Despite the fact that I got myself pretty good a few times, forcing me to pause long enough to stop bleeding so I could continue, I opted to go without for the sake of the tutorial photos. That being said, I plan to sport them in future tutorial posts if need be, because I love them the way kids love bandages. Yes, Welly bandages are on the pricey side, but you need to understand... when you become a mom, bandages are one of those things where you are willing to spend a little extra - especially when it means they actually stay put. The Handy Bandies are shaped to conform to fingers and toes. You can use them for any spot that a normal bandage refuses to stick to. Best part about these is the sticky part goes around the padding, so you don't have that weird gap that forms every time you move your fingers. Also, you get cute tins to keep after!

Continue adding and needling the wool to smooth it out. It doesn’t have to be super dense or perfect, but it does need to hold itself together and not fall off as you position the mandrake. You will have the option of adding color to the wool later if you like, or leave it all as is when you’re done.

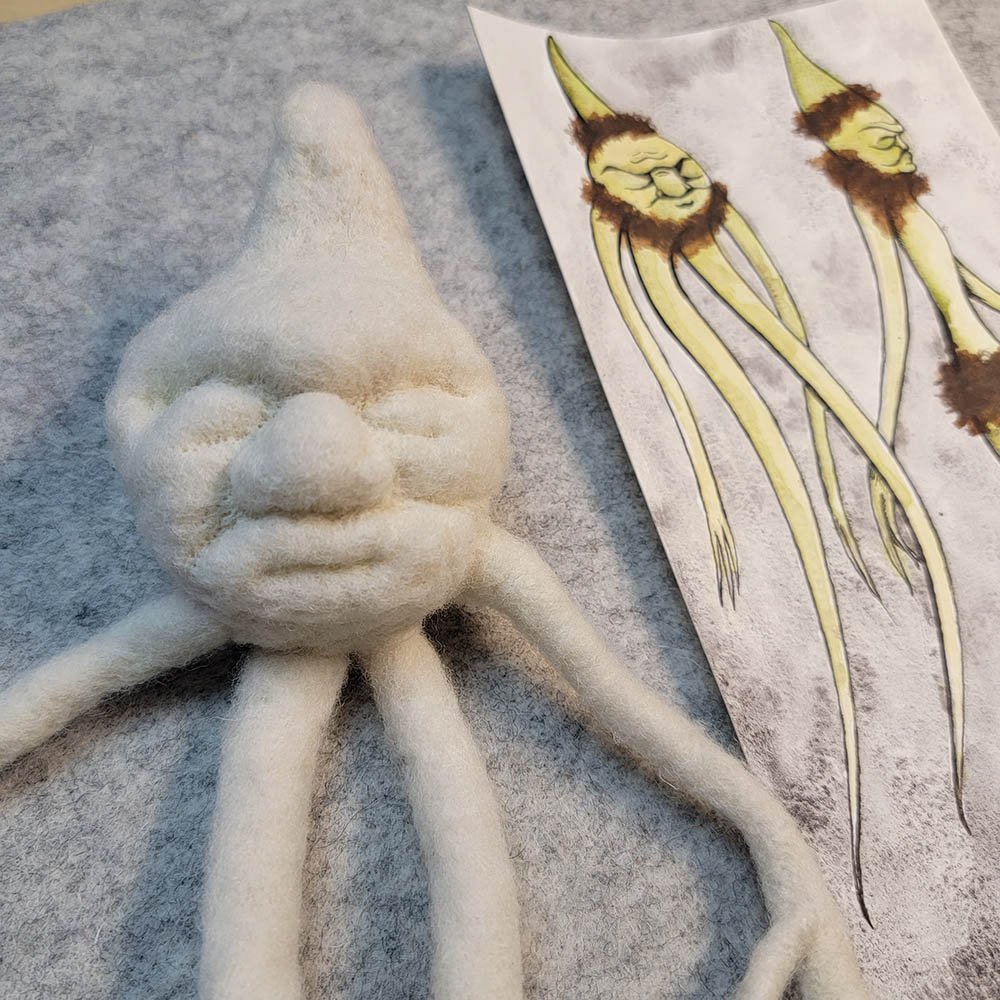
For the head, you will want to wrap with wool and stab to get a basic tear-drop shape going. It can be a bit squishy, but you will want to keep working on the surface so it has a fairly decent felted “skin.” This can be achieved by felting at an angle, or keeping the needle shallow as you poke into it. Continue rotating it around as you add wool and felt it down, so that it stays fairly even.
The reason I wanted to make sure that the arms and legs are done first, and then the head, is because this way I can wrap the wool around between the arms and the legs, and work my way down so that the legs are coming out from the top. This way, the wool of the arms and legs go into the wool of the head, rather than being simply attached to it. If you look at the image, you’ll also see that the head is fairly smooth, despite still being squishy. It will continue getting smoothed down in the next process, but you do not want it to be fuzzy and lumpy before we get started with the next part.
Shaping the head
Since my creature’s head is a bit elongated, I will be smooshing it with my hand as I work through the next process. Feel free to refer back to the original sketch to see how I’m doing the face (it’s the one on the left). The reason the face is like this, rather than something more discernable, is because it’s the wrinkles and bumps that give the impression of a face in mandrakes, not necessarily an actual human face with eyeballs and lips. All we need to do is give it some really deep wrinkles in a few key locations, spaced out just so, and it will start to resemble a face.

This is why we wanted to give it a smooth, felted skin, but leave it somewhat squishy. That’s how you achieve those deep wrinkly features. Of course, the alternative, if you needle felt very densely and can’t add in deep wrinkles, is to build up the folds in between with more wool. It makes things a bit more of a challenge to do that way, but not impossible. When stabbing in wrinkles, you want to push the needle in as far as you can. This will help to hold them in.
For the nose, you would go down at an angle in between the horizontal wrinkles. Trace the lines in the face, eyeballing it, or come up with your own lumpy wrinkled face. There are no rules. Just keep going over the wrinkles repeatedly to reinforce them, as they will start to come up and soften a bit as you work.

Keep going over your work, smoothing things out as you go. As you handle the piece, it will get a little fuzzy. It’s a process of continuous refinement as you go. Next, we will start adding color - if you like (or you can leave your mandrake naked as so - some people like the all-white look, allowing light to add depth and color).
Adding color
I wanted to add color to my mandrake to resemble the sketch to some degree - it wouldn’t be green all over, but more of a patchy green, as if there were algae growing on parts of it. Some roots do contain chlorophyll (like those of epiphytic plants, for example, orchids) and do turn green when exposed to sunlight, but seeing as these plants grow in shaded woodland areas in the earth with dappled sunlight, they would have no use for this. Then again, a creature isn’t really a plant, is it? Make of it what you will.
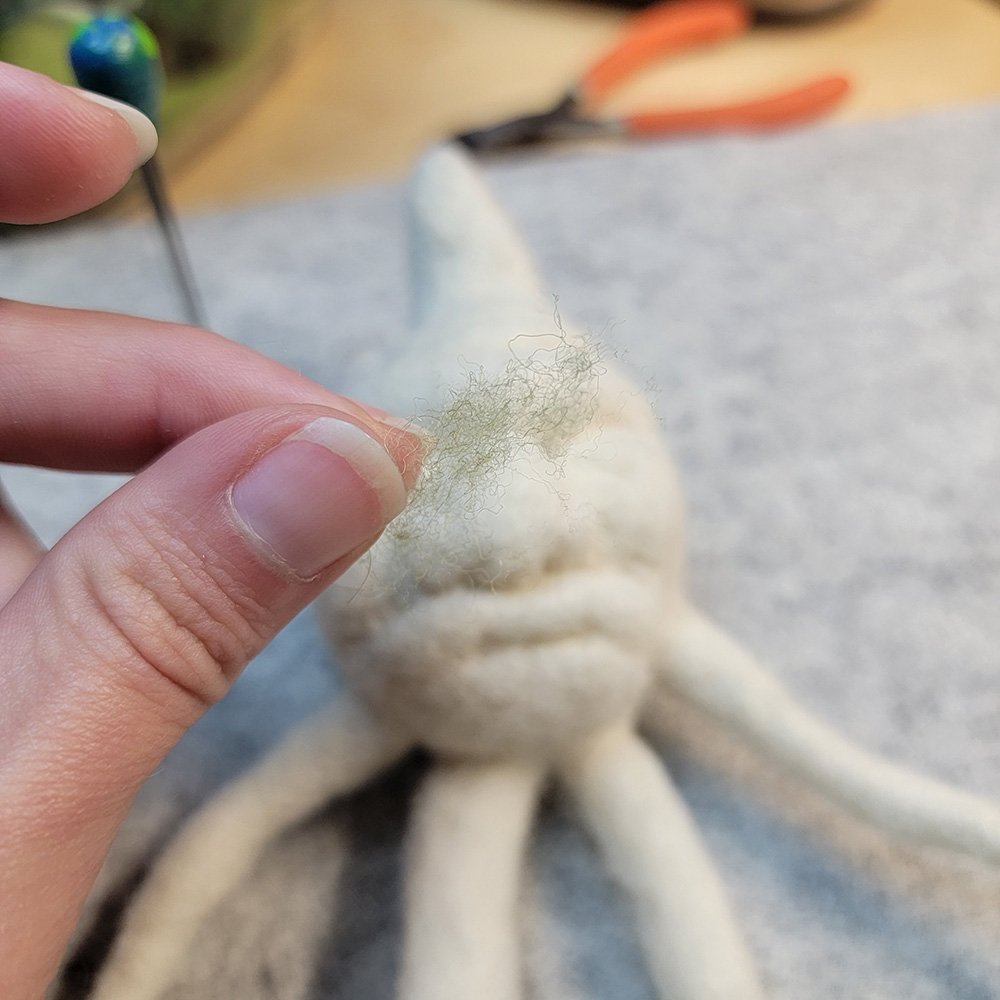
To add dappled, patchy color, I use a wool batting (not roving) in the color I want to use. To translate this into artistic terms for those who are used to working with other media, using batting to apply color is equivalent to sponging on color. It will have soft, fuzzy edges. You can go over it multiple times to make it more opaque, or leave a thin layer for just a hint of color. Roving, on the other hand, because of the nature of long, smooth staples of fiber, creates more of a brush-stroke effect. I’m not going for brush strokes here. The photo above shows exactly how thin of a layer I apply at a time. It’s much easier to build-up color than take away.

When adding darker colors, definitely try to focus some of it into the wrinkles. Also worth noting is this: go lightly! This is just to poke the color onto the surface of the “skin” - we are not adjusting the shape of anything here unless necessary. It’s okay to hit those wrinkles deeply, but other than that, just barely poke the surface, or go at an angle, when adding color to the rest.

For a better blending effect, and to help tone down some of the green, giving it more of a transparent, waxy appearance as it would on the surface of a root, go back over it with dappled thin layers of a color similar to that of the core wool, but a bit tinted. Here, I am using a very light dusty brown color that is close to the ivory of the core, but the bits of brown also gives it a hint of “dirt.” We are talking about a creature that normally hides under ground, after all.

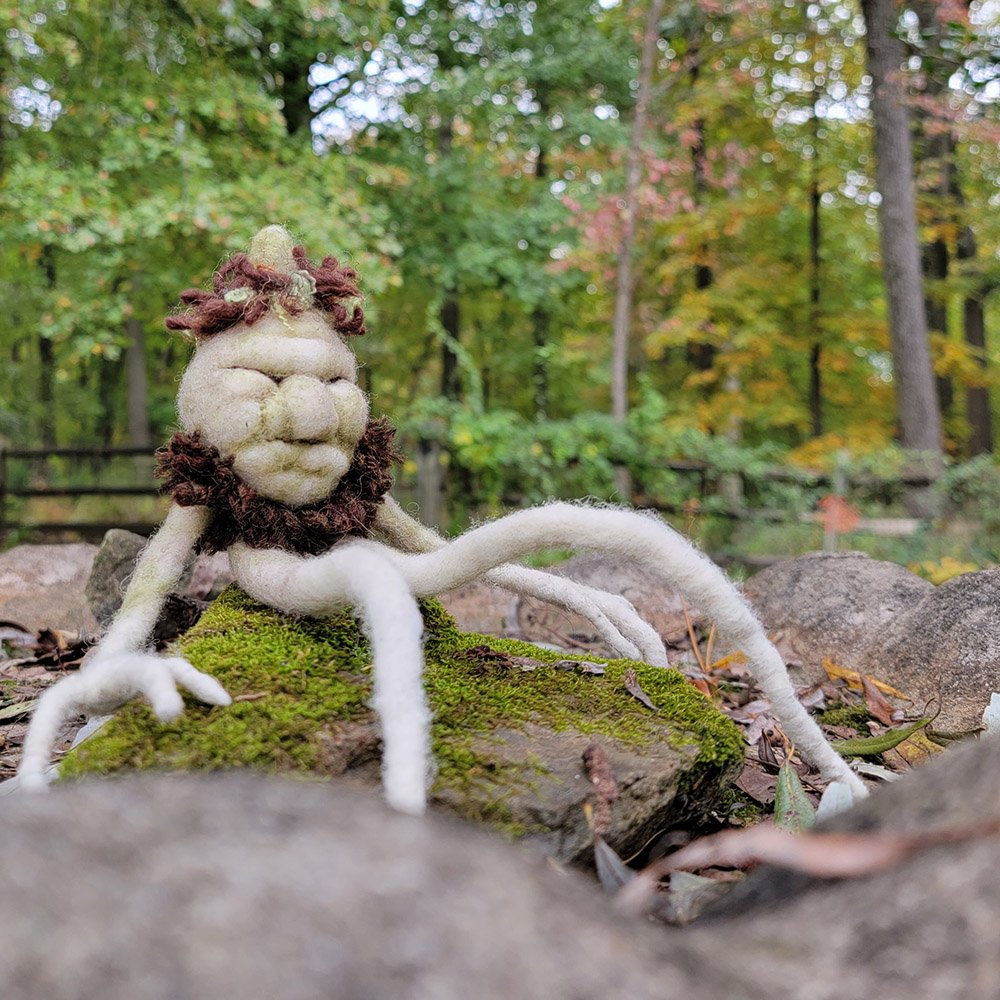
Continue adding color, having it go down the arms and legs a bit. I did not go beyond this, as the newest parts of roots, thinner ends, tend to be brighter than the rest. If you’d like to bring the color down a bit further, feel free to keep going. That right there is a look of contentment on the mandrake. They seem really satisfied with the outcome thus far.
The clothing
Here's where things get fun. I am calling this clothing, as I'm not sure what to really call it. "Dirt stuck in the rhizome's nooks and crannies" doesn't have a nice ring to it. Skirt? Tutu? Who knows.
There are several ways you can approach this. One is to use wool bits, maybe some short wool locks, if you have any on hand. Earlier in the supplies list I mentioned sari silk waste would make a good option as well. You can use bits of yarn, as I will show you below. If you don't have yarn, you can always check thrift stores or ask around if you have any crafty friends or relatives who may have some with a short length to spare (you shouldn't need more than 2ft tops for this). I have found yarn in thrift stores in the past, but the selections are often limited - you'd need to avoid ribbon, rick rack, chenille, many of the novelty yarns really. Eyelash yarn can work but you'll be stabbing in the fuzzy bits, not so much the part that holds them together. To be safe, get the stuff that looks like the yarn in your sweaters.
For those who just want a bit of yarn, and don't know anyone who may have a bit to spare, there are sellers who have various short bits of art yarns available. One I would recommend is The Fiber Goddess on Etsy, who has wool bits for needle felting. There are other shops who sell bundles of yarn scraps, but from what I saw in the mixes available, most include ones that would not work well with needle felting. Check out the yarn bundles in The Fiber Goddess's shop as well as the wool, mohair and silk sections to find ones that would work well for this project.

I had a length of this brown yarn that I love, because it has these red and green fibers mixed in when you look really close. It’s absolutely perfect for this project. Mind you, I’ve had this yarn in my jar for years - it has finally found the perfect project. I don’t normally recommend hoarding supplies, but keeping a few bits here and there in your wool storage containers isn’t going to cause any problems. Just don’t go overboard.
Oh, they don’t have to be wool, either. You can use any fluffy yarn like this. You’ll want to cut short lengths as the one in the photo. As long as it has tiny fibers that the notches on the needle can grab and push into the wool you’re in the process of stabbing, it works.

In order to attach, just lay the bit flat on the body, and stab it in the middle a few times with the felting needle. That’s all it takes. Continue cutting and attaching little bits like this all around the arms and legs. It will end up looking like this.

Wonderful! “But, what about my crown?” they ask.
Don’t worry, that’s next! Since I used up the entire length of the brown yarn I had to make that, I had to find another yarn in my jar that would work for the crown. I also ended up finding some crinkly corn fiber in my green jar that a friend had sent me years ago. I really wish I could tell you where to get more of it, because all of my searching came to dead ends. You don’t need yours to look exactly like mine though; just find whatever fun, textural bits you have that you can stab into place.

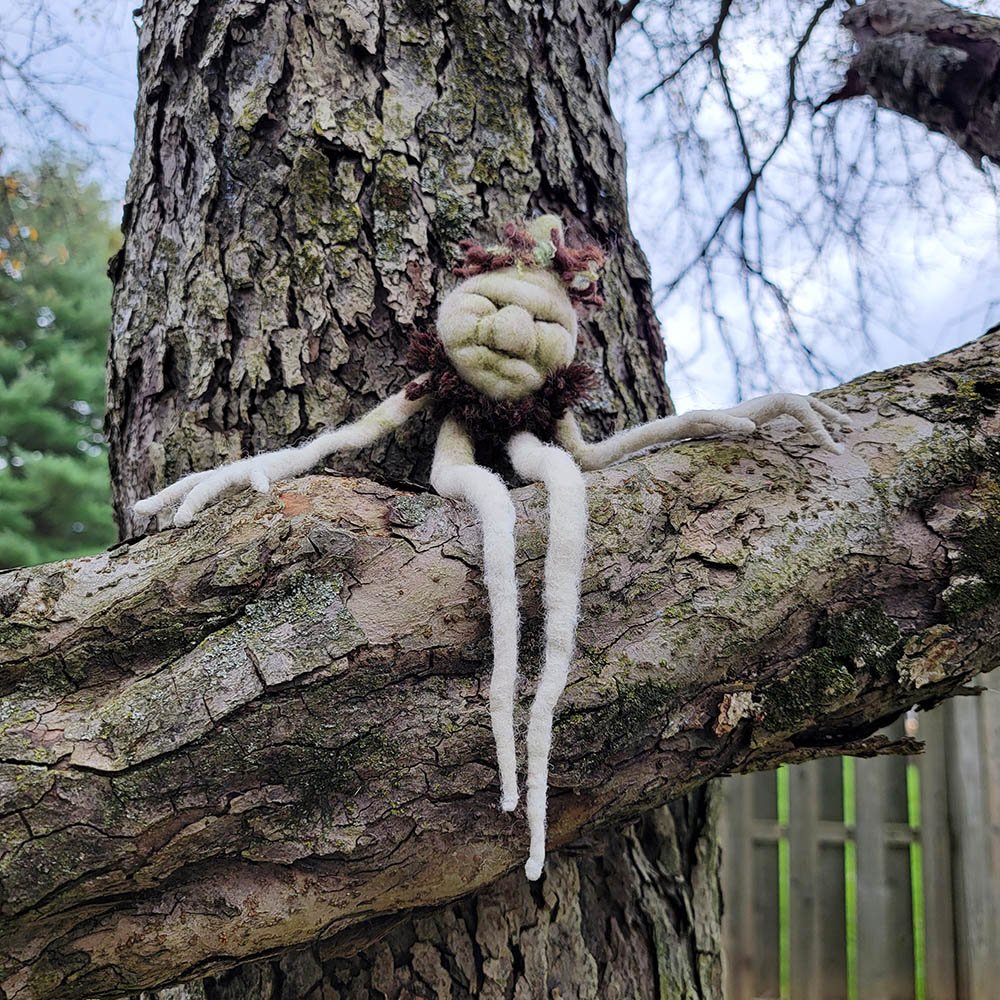
A crowning achievement, I dare say! Oh, they look happy, don’t they? I did add a bit of brown wool, just a touch, to the wrinkles in the eye spots and under the nose, just to enhance the depth a bit more.
What’s that weird stuff in the photo to the right, you ask? That, right there, is the lid from my wax warmer. I had been enjoying a sampler of natural beeswax wax warmer scents, and this one is spent (save your beeswax - you can reuse it in other ways). In fact, if you have a wax warmer, I highly recommend checking out HoweSweetItIs on Etsy.
Why I think they are worth supporting: owners Steve and Emily enjoy beekeeping as their passion and hobby, and all of the beeswax and honey products that they sell come from their hives. Steve, who is an ICU nurse by day, also helps to collect and safely rehome bee swarms, and Emily is a 6th grade math teacher. They make all of their products by hand, even getting their 90-year-old grandmother to help out, and sell their products at local farmers markets in West Virginia. Also, these wax melts are amazing, but they also have other products on hand to check out as well, including just plain blocks of beeswax if you need them. This couldn’t possibly be more wholesome.
The wax in this is fairly soft and pliable, so I will show you what I did with this. If you have beeswax that’s on hand, but it’s a bit too hard to work with, you can carefully melt it down and add a bit of oil to it (like coconut) to make it more pliable. Just make sure it cools down before you try working with it.

Once you have the wax, just melt it with the warmth of your fingers onto the tips and smooth out the wool. It will give it a bit of a waxy coating, but it will also keep the tips from getting fuzzy/unravelling, especially where it’s far too thin to needle felt. It will still be fuzzy in appearance - you will only notice it if you touch the tips of fingers or legs.
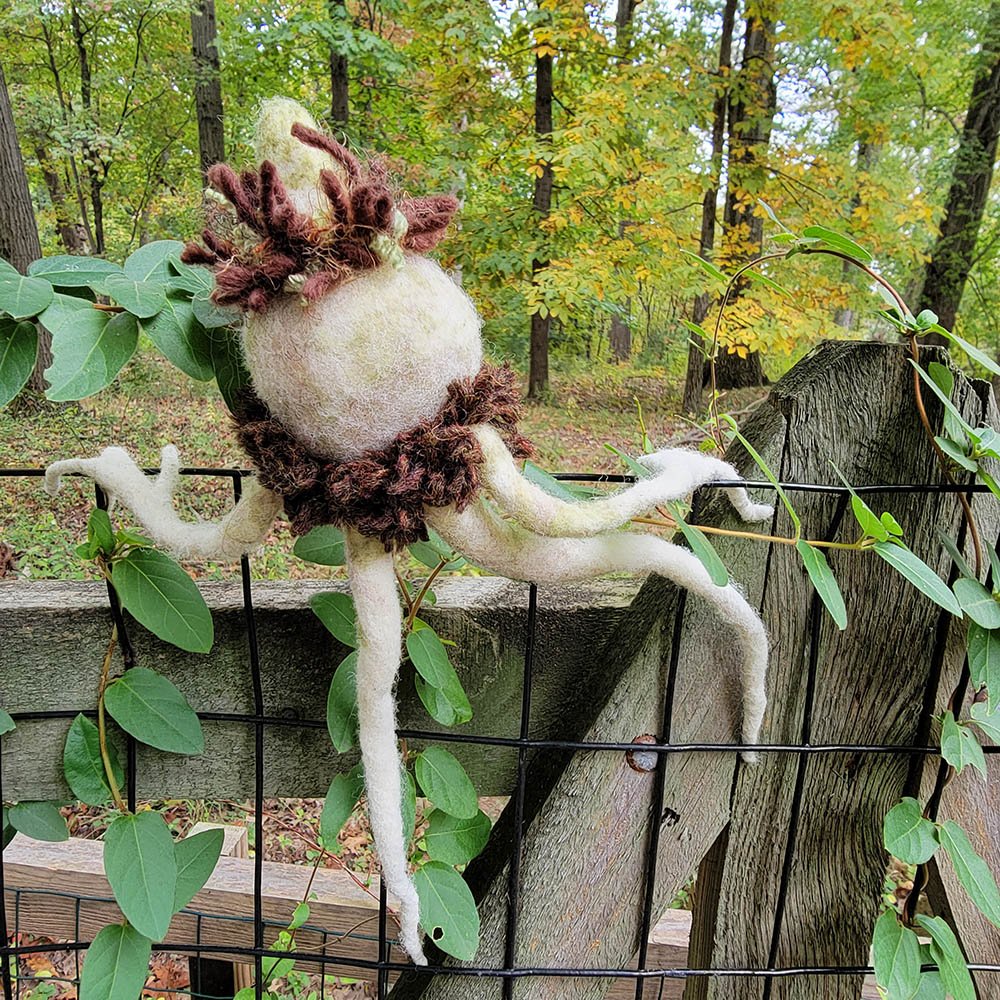
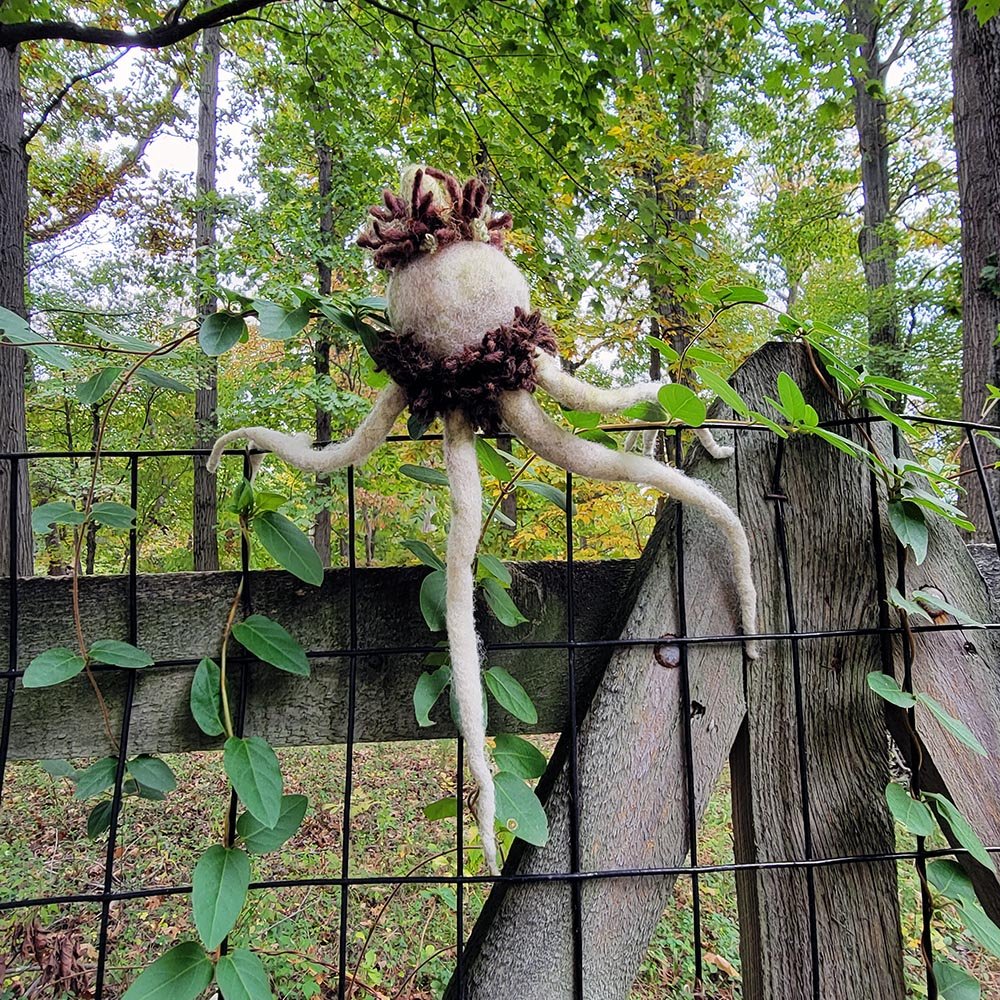
"All right, Mr. DeMille, I'm ready for my close-up."

If you enjoyed this tutorial, please share it with your friends! And don’t forget to go check out Mayapple mag, without whom this tutorial wouldn't exist.